前言
這篇指南主要討論的是, 以一般辦公室環境, 由於大多數用戶端皆為Windows, 為達到統一管理及單一登入(Single Sign On)的需求, 一般會使用Windows Active Directory網域來達成, 但若其餘系統例如Mail Server, 內部ERP等等均使用Microsoft產品或相容Microsoft之產品, 不僅在授權費用上昂貴, 相對於Open Source解決方案而言也較無彈性.
為求管理便利與成本控管, 較好的方式是內部使用者皆以Active Directory管理, 但其餘相關系統均透過Active Directory提供的LDAP或是採用Samba提供的winbind服務做認證整合. 除可同時達到前述兩項好處之外, 又可提供內部MIS人員在操作帳號及權限時的統一界面, 較低的學習曲線有助於人力預算的控制及減少錯誤與漏失的發生率.
此篇便是以此為基礎, 架設一套Active Directory網域後, 透過LDAP方式整合. 下一篇會敘述如何以Samba的winbind服務將非Windows環境的CIFS/NFS Sharing整合進Active Directory的群組原則(Group Policy)與目錄權限等控制.
以下先行敘述測試環境的相關資料.
Active Directory部份
- OS: Windows Server 2008R2 Ent. with SP-1/Latest Update (截至Oct 2012為止)
- FQDN: pdc.lab.com
- IP: 192.168.9.9
Linux部份
- OS: CentOS 6.3 x64
- FQDN: linux.lab.com
- IP: 192.168.9.7
準備Windows Active Directory環境
- 安裝Windows Server 2008R2 Ent, 並且完成最新的Windows Update
- 使用 dcpromo.exe 建立新樹系 (範例中為lab.com)
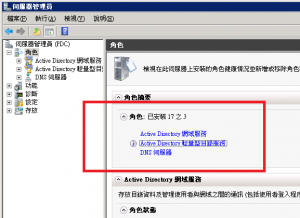
- 安裝 Microsoft Identity Management for UNIX, 包含預設的 “Password Synchronization” 與 “Server For NIS”
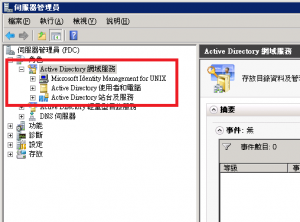
- 建立專用於Unix的使用者群組, 並設定好NIS Domain與GID. 此處UID/GID均從10000作為起始

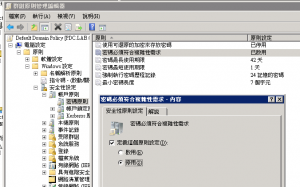
- 取消密碼複雜性需求設定, 以便後續測試 (Optional)
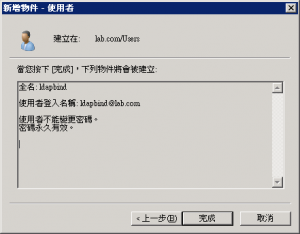
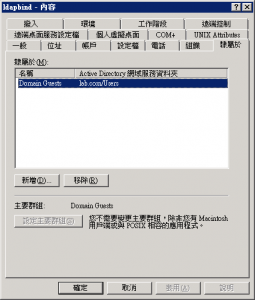
- 建立一使用於LDAP bind的帳號, 此處使用帳號為 ldapbind, 密碼為 secretone 並將此帳號併入 Domain Guests 群組.
- 建立一般使用者帳號, 除正常Domain Users之外, 將其歸入Unix Users群組, 並設定其 NIS Domain, GID, UID 等.

到此大致完成Windows端的設定.
準備Linux端設定
- 安裝 CentOS 6.3 x64, 此處以最小安裝即可
- 關閉 selinux, 開啟remote ssh root login, 關閉 iptables, 並重開機使其生效 (Optional)
# sed -i 's/=enforcing/=disabled/g' /etc/sysconfig/selinux
# sed -i 's/=enforcing/=disabled/g' /etc/selinux/config
# sed -i 's/#PermitRootLogin/PermitRootLogin/g' /etc/ssh/sshd_config
# /sbin/chkconfig iptables off
# /sbin/chkconfig ip6tables off
# /sbin/chkconfig sshd on
# reboot
- 安裝 rpmforge 與 EPEL repo, 並將套件更新至最新版
# rpm -Uvh http://packages.sw.be/rpmforge-release/rpmforge-release-0.5.2-2.el6.rf.x86_64.rpm
# rpm -Uvh http://mirror01.idc.hinet.net/EPEL/6/i386/epel-release-6-7.noarch.rpm
# yum -y update
- 安裝必須套件
# yum -y install perl pam_krb5 vim-enhanced nss-pam-ldapd ntpdate crontabs
註: 這裡特別裝了 vim-enhanced 是因為一個簡單的理由: 我慣用! 其實跟一切都沒太大關係的 XD.
- 設定/etc/hosts, 裡頭至少要有自己跟PDC的 FQDN
127.0.0.1 localhost localhost.lab.com localhost4 localhost4.lab.com4
::1 localhost localhost.lab.com localhost6 localhost6.lab.com6
192.168.9.9 pdc pdc.lab.com
192.168.9.7 linux linux.lab.com
- 設定時間同步, 這對Active Directory很重要. AD不允許PDC跟client間有超過300秒的時間差
# crontab -e
內容為
0 * * * * /usr/sbin/ntpdate pdc.lab.com 2>&1 >/dev/null
- 編輯 /etc/krb5.conf, 設定好 Kerberos 5 的認證
內容如下, 請注意裡頭該大寫的地方就真的得放大寫.
[logging]
default = FILE:/var/log/krb5libs.log
kdc = FILE:/var/log/krb5kdc.log
admin_server = FILE:/var/log/kadmind.log
[libdefaults]
default_realm = LAB.COM
dns_lookup_realm = true
dns_lookup_kdc = true
ticket_lifetime = 24h
renew_lifetime = 7d
forwardable = true
[realms]
LAB.COM = {
kdc = pdc.lab.com:88
kdc = pdc.lab.com
admin_server = pdc.lab.com:749
default_domain = lab.com
kdc = pdc.lab.com
}
[domain_realm]
.lab.com = LAB.COM
lab.com = LAB.COM
[kdc]
profile = /var/kerberos/krb5kdc/kdc.conf
[appdefaults]
pam = {
debug = false
ticket_lifetime = 36000
renew_lifetime = 36000
forwardable = true
krb4_convert = false
}
- 編輯 /etc/nslcd.conf 與啟動 nslcd 服務
內容如下
uri ldap://pdc.lab.com/
binddn cn=ldapbind,cn=Users,dc=lab,dc=com
bindpw secretone
scope sub
base cn=users,dc=lab,dc=com
scope group sub
scope hosts sub
pagesize 1000
referrals off
filter passwd (&(objectClass=user)(!(objectClass=computer))(uidNumber=*)(unixHomeDirectory=*))
map passwd homeDirectory unixHomeDirectory
map passwd gecos displayName
filter shadow (&(objectClass=user)(!(objectClass=computer))(uidNumber=*)(unixHomeDirectory=*))
map shadow uid sAMAccountName
map shadow shadowLastChange pwdLastSet
filter group (objectClass=group)
map group uniqueMember member
uid nslcd
gid ldap
ssl no
tls_cacertdir /etc/openldap/cacerts
編好存檔後, 啟動 nslcd
# /sbin/chkconfig nslcd on
# /sbin/service nslcd start
- 編輯 /etc/nsswitch.conf
在裡頭 passwd, shadow, group 的部份都加上 ldap, 大致如下
passwd: files ldap
shadow: files ldap
group: files ldap
- 編輯 /etc/openldap/ldap.conf
內容如下
URL ldap://pdc.lab.com/
BASE dc=lab,dc=com
TLS_CACERTDIR /etc/openldap/cacerts
- 測試是否連結完成
可使用 getent passwd 跟 getent group 確認LDAP群組是否已經掛上去了
# getent passwd
… 上略 …
nslcd:x:65:55:LDAP Client User:/:/sbin/nologin
ntp:x:38:38::/etc/ntp:/sbin/nologin
nekobe.wu:*:10000:10000:nekobe.wu:/home/nekobe.wu:/bin/bash
# getent group
… 上略 …
nscd:x:28:
ldap:x:55:
ntp:x:38:
Unix Users:*:10000:nekobe.wu
只要在最後看到有個來自於AD建立的群組跟使用者, 大致上就是成功了
設定系統認證
- 編輯 /etc/pam.d/system-auth
內容如下
#%PAM-1.0
# This file is auto-generated.
# User changes will be destroyed the next time authconfig is run.
auth required pam_env.so
auth sufficient pam_unix.so nullok try_first_pass
auth requisite pam_succeed_if.so uid >= 500 quiet
auth sufficient pam_krb5.so use_first_pass
auth sufficient pam_ldap.so use_first_pass
auth required pam_deny.so
account required pam_unix.so broken_shadow
account sufficient pam_localuser.so
account sufficient pam_succeed_if.so uid < 500 quiet
account [default=bad success=ok user_unknown=ignore] pam_ldap.so
account [default=bad success=ok user_unknown=ignore] pam_krb5.so
account required pam_permit.so
password requisite pam_cracklib.so try_first_pass retry=3 type=
password sufficient pam_unix.so sha512 shadow nullok try_first_pass use_authtok
password sufficient pam_krb5.so use_authtok
password sufficient pam_ldap.so use_authtok
password required pam_deny.so
session optional pam_keyinit.so revoke
session required pam_limits.so
session optional pam_mkhomedir.so
session [success=1 default=ignore] pam_succeed_if.so service in crond quiet use_uid
session required pam_unix.so
session optional pam_krb5.so
session optional pam_ldap.so
其中 pam_mkhomedir.so 是為了讓沒有home dir 的使用者依然可以登入, 並且於登入後自動建立, 免除管理人員還要進Server建目錄的困擾.
- 使用authconfig更新pam設定
# authconfig –updateall
- 測試ssh是否可登入
XShell:\> ssh nekobe.wu@192.168.9.7
Connecting to 192.168.9.7:22…
Connection established.
Escape character is ‘^@]’.
Creating directory ‘/home/nekobe.wu’.
Last login: Thu Oct 25 14:37:22 2012 from localhost
[nekobe.wu@linux ~]$
如此一來就算大功告成, 後續其他Linux相關認證都可以這樣比照辦理.
其他需要知道的
- 如果不想讓 AD 上的 user 登入到 Unix 去, 除了可以在/etc/nslcd.conf 裡頭變更 passwd 與 group 的 filter 之外 (例如限制 memberOf 的方式), 也可以在AD Attribute裡頭把 loginShell 改成 /bin/false, 如此一來可以讓User認證其他服務如 Email, FTP等等, 但是卻無法sshd/telnet 登入.
- 若是沒有在AD端設定好Unix相關attributes, 例如uidNumber, gidNumber, unixHomeDirectory, loginShell 等等重要屬性, 會導致因 filter 設定的關係無法登入, debug時要注意這一點, 也或者可以拿這個condiction當成過濾的方式.
- 若是nslcd一直無法設定完成, 可以先停掉服務, 改用 debug mode
# /sbin/service nslcd stop
# nslcd -d
nslcd: DEBUG: add_uri(ldap://pdc.lab.com/)
nslcd: DEBUG: ldap_set_option(LDAP_OPT_X_TLS_CACERTDIR,"/etc/openldap/cacerts")
nslcd: version 0.7.5 starting
nslcd: DEBUG: unlink() of /var/run/nslcd/socket failed (ignored): No such file or directory
nslcd: DEBUG: setgroups(0,NULL) done
nslcd: DEBUG: setgid(55) done
nslcd: DEBUG: setuid(65) done
nslcd: accepting connections
以上, 預計還會再做的部份是 Samba 的 winbind 整合目錄與群組權限管理, 以及更精細的從AD端控制Unix端使用, 還有各種如 email, ftp 等相關服務.
請問一下,我的AD帳號有中文字碼,當我對有中文字碼的AD帳號的欄位(UNIX Attributes)選擇時候會出現”Multibyte and single byte KANA characters are illegal for name and UNIX attributes”
這串警告…是否不支援中文字碼????
Dear 大大
請問一下,我的AD帳號有中文字碼,當我對有中文字碼的AD帳號的欄位(UNIX Attributes)選擇時候會出現”Multibyte and single byte KANA characters are illegal for name and UNIX attributes”
這串警告…是否不支援中文字碼????
是的, 不支援中文字.